Mário Tiago Ledo
Clássico
Está a ficar no ponto.
Essa alavanca interior de abrir a porta é de alumínio?
Essa alavanca interior de abrir a porta é de alumínio?
A alavanca de abrir a porta julgo que seja cromada. O meu pai tinha-a guardada há alguns anos da épocaEstá a ficar no ponto.
Essa alavanca interior de abrir a porta é de alumínio?
")


Tem de se ir habituando o pequeno...
Vou por depois de alinhar os faróis. Não queria estar a pôr os aros e depois tirar para os alinhar. Nos próximos dias já devo alinhar os faróis e já os meto. Estão pontinhos para serem colocados lá em casaJá se viu que tem garra!
Põe os aros dos faróis, fica mesmo estranho (marciano) assim...
Já se viu que tem garra!
Põe os aros dos faróis, fica mesmo estranho (marciano) assim...
As únicas coisas que faltam para a inspeção são:Quando pensas que irá estar pronto para a inspeção?
Curtos.Uma dúvida que agora me passou pela cabeça, estas a utilizar amortecedores curtos ou os de dimensões normais?
Curtos.
Mas já tivemos de subir um pouco a altura do Mini porque a roda direita estava a raspar ligeiramente na aba ao virar tudo para a esquerda em locais inclinados. Mas não tem os batentes que devia o charriot. Acho que vão ter de se colocar!
Exatamente isso!Queres com isso dizer que o movimento da suspensão estava a ser maior do que aquilo que deve ser? O que te falta é o Bump Stop?
Ando aqui a tentar perceber o que melhor se enquadra para aquilo que estou a pensar colocar no meu, se irei colocar amortecedor curto ou convencional.

Muito boa explicação e muito obrigado pela informação partilhada.Viva ,
A diferença entre os amortecedores curtos e normais , é que os curtos trabalharam melhor em suspensões rebaixadas , tem menor curso , os normais neste caso estaria a trabalhar num curso de utilização menor logo não seria os mais correto , o inverso também seria incorreto colocar amortecedores curtos para uma utilização da suspensão com alturas dentro dos valores normais.
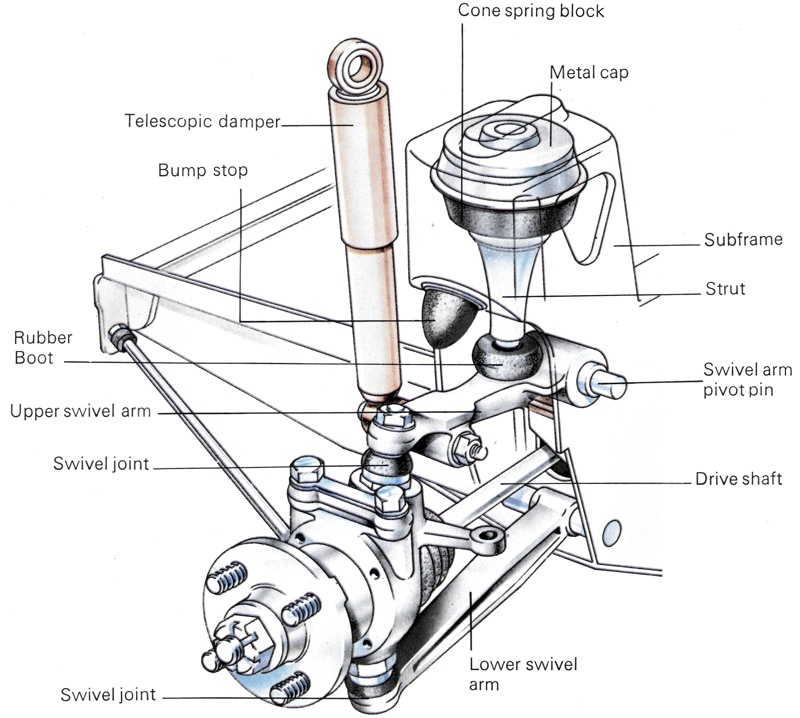
Julgo que tem colocado no carro suspensão com os braços da frente ajustáveis , afinação do geometria da suspensão é muito importante , os bump stop não devem ser retirados , quando muito colocar uns de poliuretano que são ligeiramente mais curtos ,
e convém acertar a altura correta e depois fazer o setup da suspensão e alinhamento da direção , pois sempre que altera a altura do carro , vai alterar setup da geometria da suspensão , e o roçar que refere pode não ter haver com a altura mais sim com o angulo do caster , o avanço ou recuo da roda no seu eixo .
Boas afinações.
No seu mini que tipo de configuração utiliza?Viva ,
A diferença entre os amortecedores curtos e normais , é que os curtos trabalharam melhor em suspensões rebaixadas , tem menor curso , os normais neste caso estaria a trabalhar num curso de utilização menor logo não seria os mais correto , o inverso também seria incorreto colocar amortecedores curtos para uma utilização da suspensão com alturas dentro dos valores normais.
Julgo que tem colocado no carro suspensão com os braços da frente ajustáveis , afinação do geometria da suspensão é muito importante , os bump stop não devem ser retirados , quando muito colocar uns de poliuretano que são ligeiramente mais curtos ,
e convém acertar a altura correta e depois fazer o setup da suspensão e alinhamento da direção , pois sempre que altera a altura do carro , vai alterar setup da geometria da suspensão , e o roçar que refere pode não ter haver com a altura mais sim com o angulo do caster , o avanço ou recuo da roda no seu eixo .
Boas afinações.
E a nivel de cepos?Antes de responder a primeira pergunta , começo pela segunda , sim com os Hi-Lows será a melhor forma de alterar altura do carro , dito isto , num Mini para utilização em estrada , não convém baixar muito , pois o Mini já sofre de pouco curso de suspensão, ao rebaixar ainda fica com menos , e as características capacidades de manobra ficam bastante alteradas para pior ,
Se estivéssemos a falar de um carro para correr em pista seria deferente , e no meu tenho ligeiramente mais do que origem ,
e vou enviar 3 Setup‘s que não altura pesquisei para me orientar , o meu carro tem Hi-lows , amortecedores normais , e o kit de suspensão ajustável a frente e trás , o está com Setup 2. Mas são muito semelhantes
Aqui vai a informação :
1-Setup
Front:
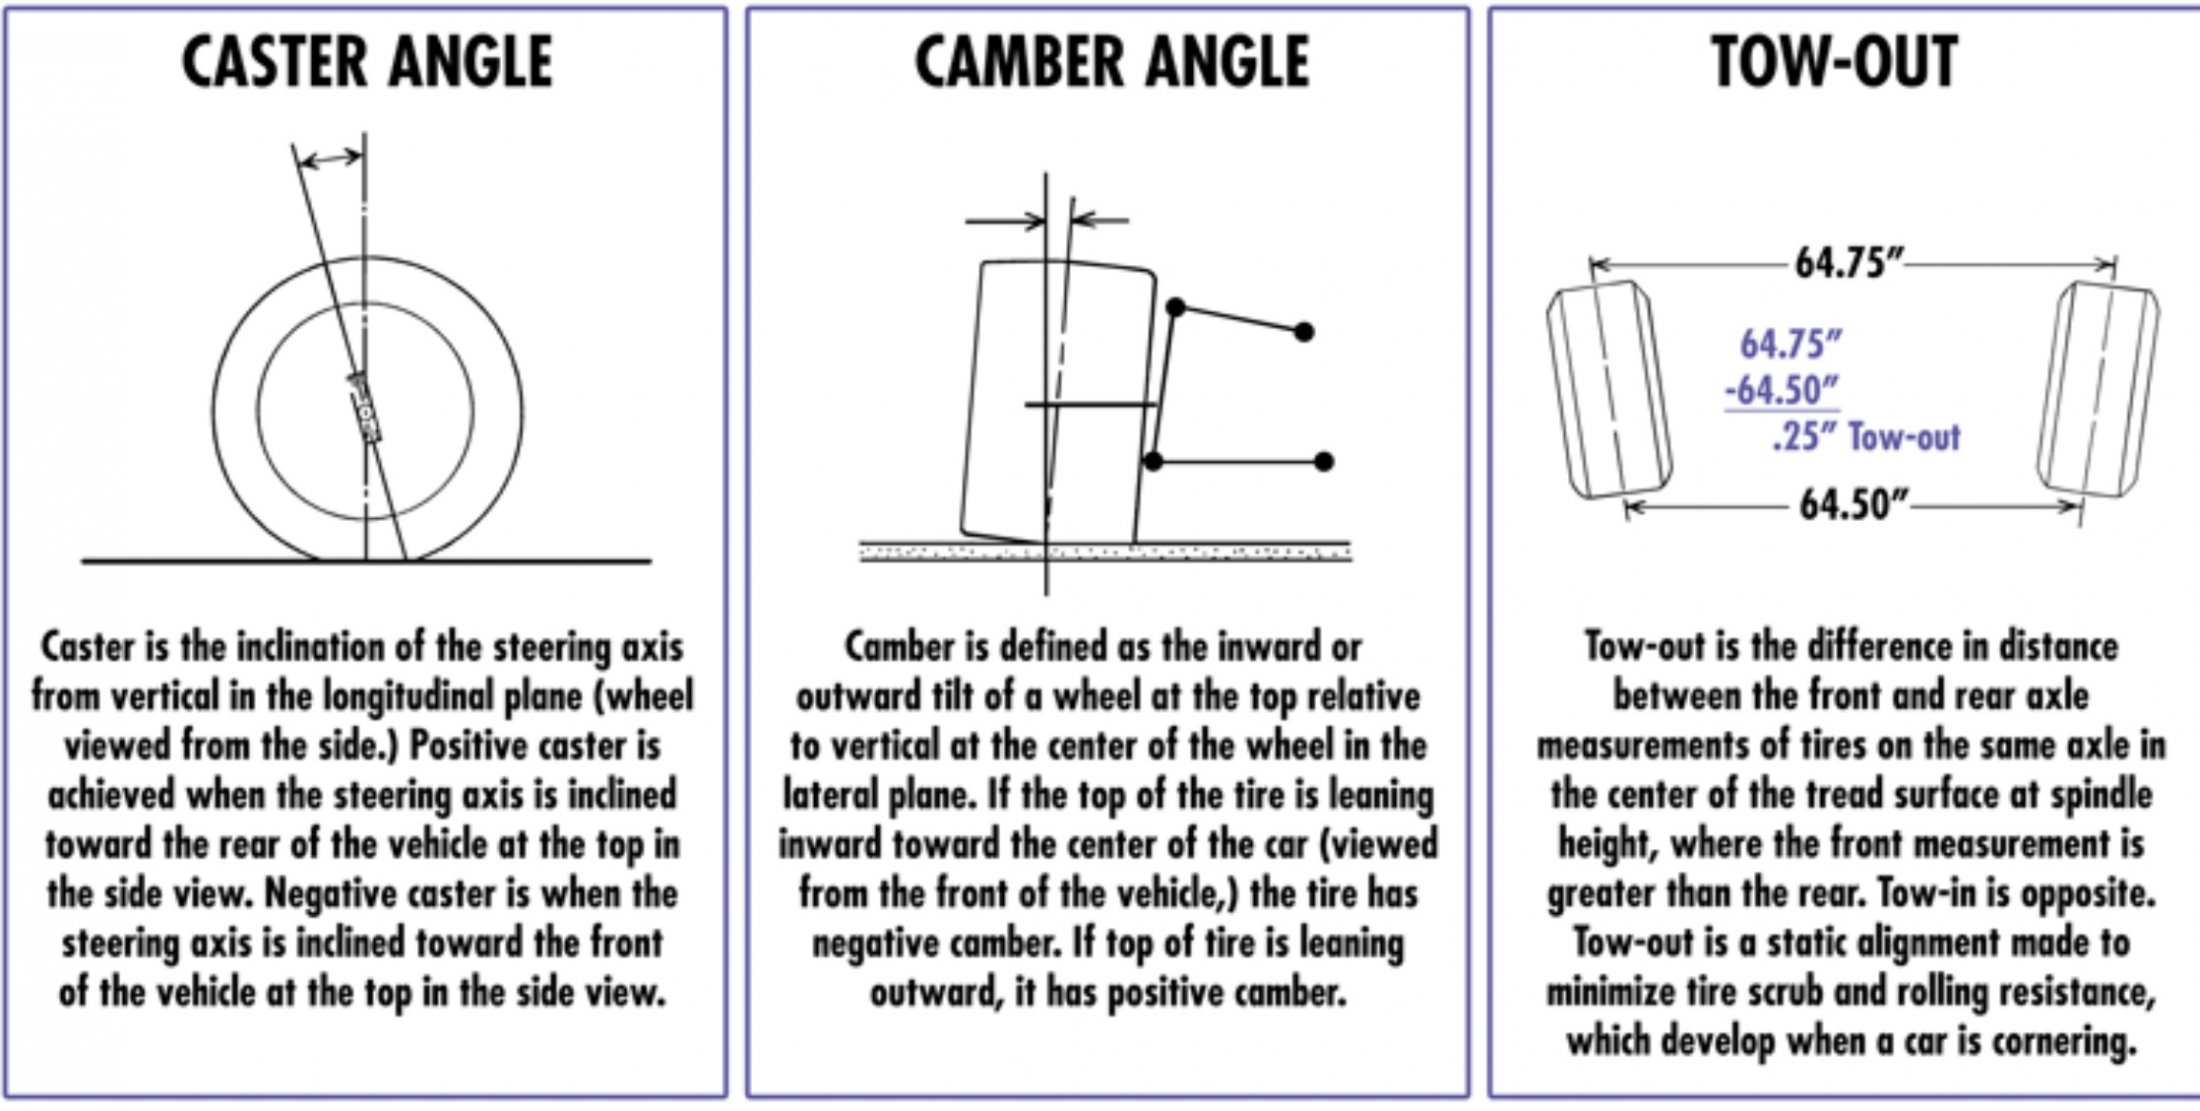
With negative camber lower arms fitted, set the ride height to standard. Track it straight ahead with no toe-out or toe-in. With the adjustable front tie bars set 3 deg of castor, plus or minus 0.5 deg to allow for tolerances in the sub-frame to ensure that the wheels are in the same geometrical position with respect to the centres of the rears. Don't set too high a damper stiffness. The reason I say standard ride height is that the Mini has little enough suspension travel as it is and the sump is very low if you lower the car. For track use it's a different matter.
Rear:
Set camber at 0 to 0.5 deg negative. There must be NO positive camber on the rear.
Set the rear track, and this is very important in overall handling terms for a road car, to between 1/8"and 3/16" toe-in. If the camber adjust brackets won't allow this to be set, then you either put shims behind the trailing arm brackets, or grind a bit off the bracket faces to achieve less or more toe-in respectively.
Again set standard ride height, although the rear can go down by about 1/2" from standard. Don't set the dampers too stiff in order that the suspension can work properly
If you do this accurately your Mini will really handle, turn in and ride any normal bumps well. I've driven some really nasty lowered Minis on the road and whilst they will set good lap times on a circuit, on the road they are next to useless for any quick driving on twisty narrow lanes, where the Mini is at its best.
2-Setup
Front; 0.5 to 1.5 degree negative camber, which can be achieved with either different lower arms or offset lower arm inner bushes.
3 to 3.5 degrees caster which can be achieved with adjustable tie-bars.
1mm to 2 mm toe-out
Rear: zero to 0,5 degrees negative camber
1 mm to 2 mm toe-in
This can be achieved either with adjustable brackets or by filing the hole in the bracket forwards and/or upwards until the correct settings are achieved, then welding on a large washer to maintain the settings. If there is too much toe-in on the rear the brackets need to be shimmed away from the sub-frame mating face.
Accurate measurements are critical. When done both road-holding and handling will be much improved.
Set the car to standard ride height, not lowered for best overall performance on the
normal roads.
3-Setup- Keith Dodd ( Minispares )
The first area to look at before tackling any of these modifications is the front subframe when the car is post 1976 (rubber mounted subframe type). Replace the front subframe tower mountings with any of the solid types available if not already done.
The front teardrop mountings should also be changed for solid type which might increase road noise but when this is not a consideration for performance use change all rubber mountings to solid types. Quite often the tower rubber mountings are not correctly lined up but by removing the tower bolts you can see visually whether they are in line or not. Then check that the wheel centres on each side of the car are the same distance apart or modifications will have to be mad
Secondly, make sure the car is the correct height you require, and that the two rear corners and two front corners are equal side to side, (fit Hilos if required) remember lowering height increases castor and negative camber with the opposite happening when you increase height at the front only.
Thirdly, sort out the castor angles as castor adjustment also alters camber (and vice versa)
Ideally the front castor angles should be set at 3 to 3.5 degrees with the later usually being ideal to allow for clearances on wheel arches.
Tracking on a mini is ultra important as it suffers badly from bump steer. You should have toe out at the front, of 1/16 to 1/8 of an inch. And toe in at the rear of at least 1/16 of an inch. “Toe in” means that the leading edge of a pair of wheels is narrower than the trailing edge, “Toe out” is obviously the reverse (Toe out at the rear is dangerous)
Lastly, set the Negative Camber angles and the following are road suggestions,
on 10” wheels Front 1.5 to-2.00 degrees ----- Rear 0.75 to 1 degree
on 12” wheels Front 1 to 1.5 degrees ----------Rear 0 to 0.50 degrees
on 13” wheels Front 0.5 to 0.75 degrees ------Rear Zero
Acho que o Luis António já respondeu as questões.No seu mini que tipo de configuração utiliza?
Amortecedores curtos apenas "funcionam" com Hilos ?
Muito boa informação. Parte dela já tinha visto. Acredito que o motivo para apenas o lado direito da frente bater na aba se prenda com dois fatores: falta do "bump stop" e problema nos cepos, que espero vir a resolver com os cepos novos e a instalação dos batentes.Antes de responder a primeira pergunta , começo pela segunda , sim com os Hi-Lows será a melhor forma de alterar altura do carro , dito isto , num Mini para utilização em estrada , não convém baixar muito , pois o Mini já sofre de pouco curso de suspensão, ao rebaixar ainda fica com menos , e as características capacidades de manobra ficam bastante alteradas para pior ,
Se estivéssemos a falar de um carro para correr em pista seria deferente , e no meu tenho ligeiramente mais do que origem ,
e vou enviar 3 Setup‘s que não altura pesquisei para me orientar , o meu carro tem Hi-lows , amortecedores normais , e o kit de suspensão ajustável a frente e trás , o está com Setup 2. Mas são muito semelhantes
Aqui vai a informação :
1-Setup
Front:
With negative camber lower arms fitted, set the ride height to standard. Track it straight ahead with no toe-out or toe-in. With the adjustable front tie bars set 3 deg of castor, plus or minus 0.5 deg to allow for tolerances in the sub-frame to ensure that the wheels are in the same geometrical position with respect to the centres of the rears. Don't set too high a damper stiffness. The reason I say standard ride height is that the Mini has little enough suspension travel as it is and the sump is very low if you lower the car. For track use it's a different matter.
Rear:
Set camber at 0 to 0.5 deg negative. There must be NO positive camber on the rear.
Set the rear track, and this is very important in overall handling terms for a road car, to between 1/8"and 3/16" toe-in. If the camber adjust brackets won't allow this to be set, then you either put shims behind the trailing arm brackets, or grind a bit off the bracket faces to achieve less or more toe-in respectively.
Again set standard ride height, although the rear can go down by about 1/2" from standard. Don't set the dampers too stiff in order that the suspension can work properly
If you do this accurately your Mini will really handle, turn in and ride any normal bumps well. I've driven some really nasty lowered Minis on the road and whilst they will set good lap times on a circuit, on the road they are next to useless for any quick driving on twisty narrow lanes, where the Mini is at its best.
2-Setup
Front; 0.5 to 1.5 degree negative camber, which can be achieved with either different lower arms or offset lower arm inner bushes.
3 to 3.5 degrees caster which can be achieved with adjustable tie-bars.
1mm to 2 mm toe-out
Rear: zero to 0,5 degrees negative camber
1 mm to 2 mm toe-in
This can be achieved either with adjustable brackets or by filing the hole in the bracket forwards and/or upwards until the correct settings are achieved, then welding on a large washer to maintain the settings. If there is too much toe-in on the rear the brackets need to be shimmed away from the sub-frame mating face.
Accurate measurements are critical. When done both road-holding and handling will be much improved.
Set the car to standard ride height, not lowered for best overall performance on the
normal roads.
3-Setup- Keith Dodd ( Minispares )
The first area to look at before tackling any of these modifications is the front subframe when the car is post 1976 (rubber mounted subframe type). Replace the front subframe tower mountings with any of the solid types available if not already done.
The front teardrop mountings should also be changed for solid type which might increase road noise but when this is not a consideration for performance use change all rubber mountings to solid types. Quite often the tower rubber mountings are not correctly lined up but by removing the tower bolts you can see visually whether they are in line or not. Then check that the wheel centres on each side of the car are the same distance apart or modifications will have to be mad
Secondly, make sure the car is the correct height you require, and that the two rear corners and two front corners are equal side to side, (fit Hilos if required) remember lowering height increases castor and negative camber with the opposite happening when you increase height at the front only.
Thirdly, sort out the castor angles as castor adjustment also alters camber (and vice versa)
Ideally the front castor angles should be set at 3 to 3.5 degrees with the later usually being ideal to allow for clearances on wheel arches.
Tracking on a mini is ultra important as it suffers badly from bump steer. You should have toe out at the front, of 1/16 to 1/8 of an inch. And toe in at the rear of at least 1/16 of an inch. “Toe in” means that the leading edge of a pair of wheels is narrower than the trailing edge, “Toe out” is obviously the reverse (Toe out at the rear is dangerous)
Lastly, set the Negative Camber angles and the following are road suggestions,
on 10” wheels Front 1.5 to-2.00 degrees ----- Rear 0.75 to 1 degree
on 12” wheels Front 1 to 1.5 degrees ----------Rear 0 to 0.50 degrees
on 13” wheels Front 0.5 to 0.75 degrees ------Rear Zero